To make your website stand out in search engines and have more visitors is obligatory. However, there are particular times when a noindex tag that is not intended could be used to stop search engines such as Google and Yahoo from indexing your content. This article is a guide on how to restore the noindex tag in WordPress so that your website is properly listed and SEO optimized for search engines like Google.
What Does a Noindex Tag Mean?
A noindex tag is a type of HTML tag that tells search engines not to index a web page. It is especially useful for web pages that you do not want to be shown in search engine results. For example, this noindex tag can be placed on search engine results or admin pages or duplicate content.
Common Reasons for having Noindex Tags on WordPress
There are causes that may lead to your WordPress site to be marked specially with a tag on noindex.;
1. WordPress Settings: The combination “Discourage search engines from indexing this site” might be set off at your WordPress settings.
2. SEO Plugins: Tools like YoastSEO All, in One SEO or Rank Math can be the ones that automatically include a noindex tag on pages due to their configurations.
3. Theme or Custom Code : While developing your website you should contemplate applying themes or custom code which potentially involve the use of noindex tags, such as capabilities file codes.
Steps on How to Remove Noindex Tag in WordPress

Step 1. Check WordPress Settings
The first step is to check wordpress settings:
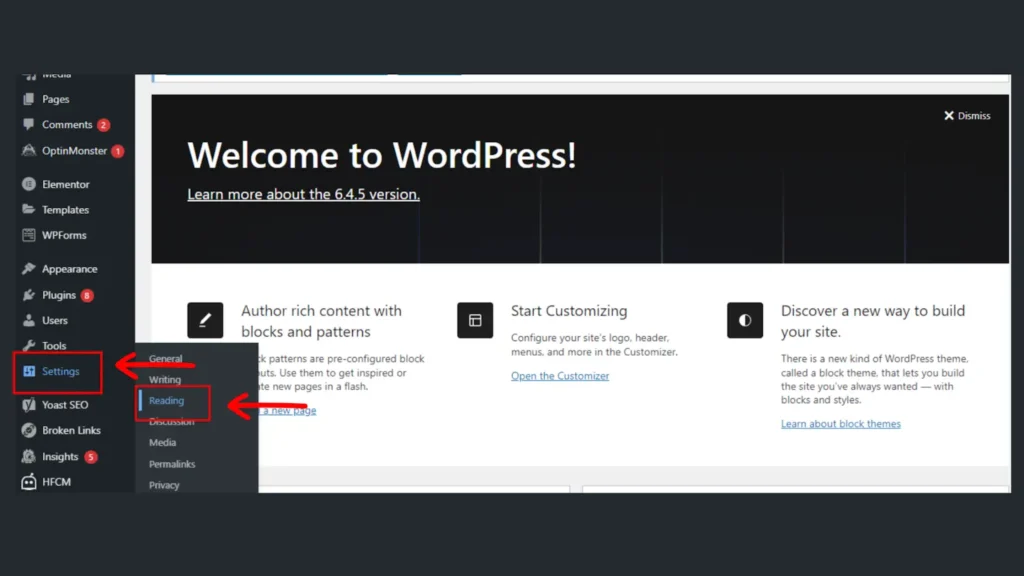
1.Firstly, log in to your WordPress dashboard.
2. secondly, open the Settings > Reading.
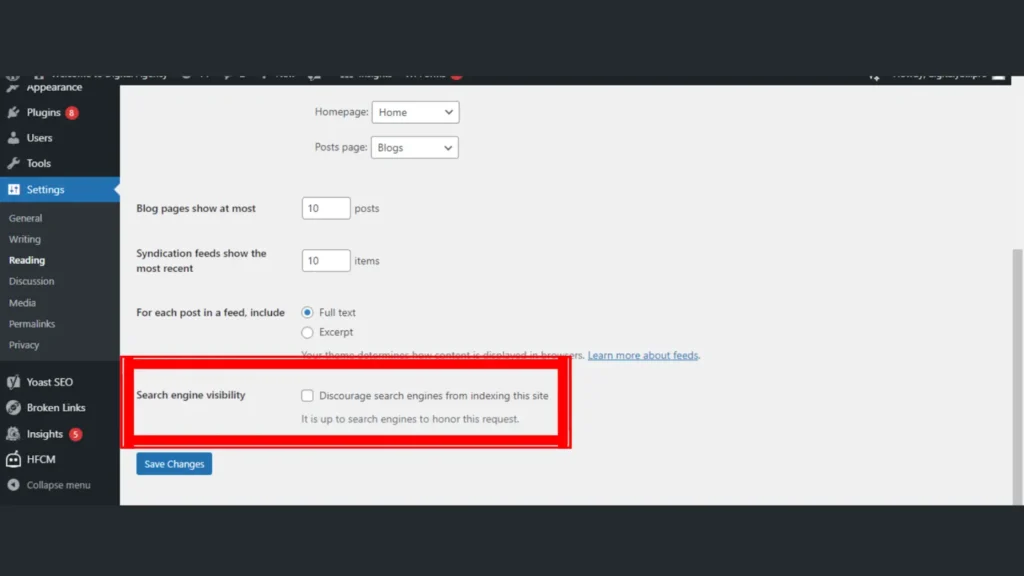
3. Thirdly, where is the option for the Search Engine Visibility category located?

4. Ensure that the checkbox for “Discourage search engines like google from indexing this web site” is unchecked.
5. Adjust the settings and enjoy the new look.
Through the removal of the feature, you afford search engines to index your website. but suppose this feature has been checked, go to step 2.
Step 2. Review Your SEO Plugin Settings
SEO plugins even have the option to put noindex tags on pages or certain types of content. Here are the settings for someone who wants to check the settings on the most popular SEO plugins:
Yoast SEO:
1. You must get the SEO screen from the menu and choose Search Appearance.
2. Examine the settings for content type (Posts, Pages, Media) and taxonomies (Categories, Tags).
3. The page will explode into view with all the settings being “Yes” and categories will be shown in search results.
4. Besides, try character pages or posts:
Open your page.
Now, please find Yoast seo meta placement at the bottom and click on it.
Choose “advanced” and make sure “Allow search engines to display this page in search results” is the value for the meta tag.
All in One SEO:
1. You should head to All in One SEO > Search Appearance.
2. There you can view the settings for content types and taxonomies.
3. Make sure that “Use Default Settings” is ticked and “Search engines really have to process a lot of data in order to find repeating information.” is set for the “Default: show in search results” option for every content item.
4. In the case of individual pages or posts:
Rank Math:
1. Navigate to Rank Math > Titles & Meta.
2. Evaluate the settings for every content kind and taxonomy.
3. Make sure that the “show {Content Type} in search results” is enabled.
4. For individual pages or posts:
- Edit the web page or publish.
- Scroll right down to the Rank Math seo meta field.
- Ensure the “Advanced” tab is set to “Index.”
Step 3. Investigate Theme and Custom Code
Noindex tags may occasionally be present in your theme’s functions.php file due to custom code applied to the theme. Here’s how to check and get rid of them:
1. Take a Look at Theme’s Settings:
Navigate to Appearance > Theme Editor.
Evaluate the header template header.php and different relevant templates for noindex tags.
2. Evaluation Custom Code:
Check the functions.php record for your theme or child theme.
Look for any custom code that consists of noindex tags and do away with them.
3. Child Themes:
If you are using a child theme, ensure you check both the parent and child theme files.
Step 4. Use Google Search Console to Remove Noindex tag
After making the essential modifications, use Google Search Console to request indexing and confirm the removal of the noindex tag:
1. Firstly, log in to Google Search Console.
2. Secondly, select your property.
3. Thirdly, use the URL Inspection tool to check specific URLs.
4. Fourthly, if the noindex tag has been removed, request indexing for the updated pages.
Conclusion
It is essential to remove a noindex tag from your WordPress website in order for search engines to index it and for it to receive natural website traffic. Additionally, you may efficiently manage and delete noindex tags by looking over your WordPress settings, analyzing SEO plugin configurations, and examining theme or custom code. In order to keep your site as visible in search results as possible, check its index status on a regular basis with tools like Google Search Console.

